Hey guys!
Here is the first project file from the stuff I've been teasing for a while. The latest tutorial is up on YouTube, where we model and rig robotic arms and attach them to motion capture!
So this project file is from one of the cinematics I made for the tutorial, and I think it has some interesting features!
First of all, if this scene renders ridicolously slowly on your computer, don't worry: I went a bit crazy with the glass material and increased light bounces, so this project file will be extremely render heavy. I actually had to rent an external GPU to be able to render this in time for the tutorial! But I still hope it can be valuable to pick this scene apart and see what makes it tick.

One of the reasons for the increased render times is the custom anamorphic bokeh. It's a transparent plane with a cut-out hole. The hole has an aspect ratio of 2:1, and it has a bright edge with a dark center. This is placed perfectly in front of the camera, so it creates a custom anamorphic bokeh shape. This also creates a beautiful vignette on the entire image. (Fun fact: This trick also works in real life with real lenses, I do this on the lens of my A7S II camera when I want an anamorphic look).

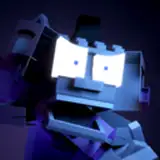
The claw uses an Array Modifier so you only have to animate one 'finger' to control the entire claw with a rotational symmetry of 120 degrees.

The robotic arm uses 40 bones with an Inverse Kinematic constraint, as shown in the tutorial. In retrospect I think 40 bones are too much, because there is a subtle lag/glitch going on in the IK constraint (This is not the glitch I'm talking about in the tutorial). You can see this weird glitch by subtly rotating or moving the IK target, and the joints in the arm might jump a little bit around. It's very weird, and I think we're stretching the limit of the IK constraint! So if you want to do close-up shots of your own rigged robotic arm, I recommend using 20-30 bones (or less) instead.

To save render time, the backdrop is an emission gradient instead of a diffuse material. Since there would be no visible shadows in this close-up, there are no need to calculate them. This is an efficient way to reduce the amount of light bounces in the scene!
You can download the project file here: Robotic_Claw_v3.0.blend
I also want to thank you for your support. It is now possible for me to spend even more time on an in-depth tutorial like this, and it opens doors to exploring different and more unique topics. It is honestly my dream coming true! So if you are reading this, it means you are one of the people who make this possible, and I want you to know that it is very much appreciated. Thank you for the support!
- Asbjørn
Cosmo
2022-01-27 16:17:18 +0000 UTCPolyfjord
2022-01-27 16:00:14 +0000 UTCCosmo
2022-01-27 15:12:03 +0000 UTC